|


|

|

Digital Contrast Masking
Use these five steps to improve the tonality in your photos
Text And Photography By Richard Pahl
Want better control over the tonal range of your photographs? Tonal range refers to the gradations from highlight to shadow in your photographs. An original image with broad tonal range (or lots of steps between highlights and shadows) results in prints with better color and overall image quality.

|
Got layers? Then you can try "contrast masking" to vastly improve the tonality in your photos. Based on a trick used by master printers in traditional darkrooms, the digital equivalent of the technique described here is easy to learn and use.
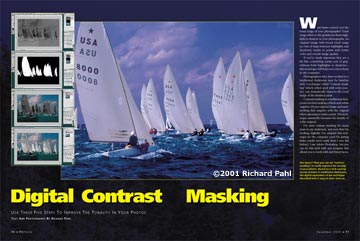
Bring out the full tonal possibilities in your images. By creating a black-and-white negative of your original and "blending" the two together, you increase the density of the image's lighter, overexposed areas without much affecting the darker parts of the image. You can use this technique to adjust the whole image or selected parts only.
|
If you've made exposures that are a bit flat—everything seems sort of gray, without bold highlights or shadows—this technique will help you correct them in the computer.
Photographers who have worked in a traditional darkroom may be familiar with a technique called "contrast masking" which, when used with some practice, can dramatically improve the tonal range of the finished print.
Contrast masking in a traditional darkroom involves making a black-and-white negative of your original image and sandwiching that negative with the original when exposing to make a print. This technique essentially increases the density of a flat original.
I've used contrast masking for many years in my darkroom, and now that I'm working digitally, I've adapted this technique for the computer (and I'm getting better results more easily than I ever did before). I use Adobe Photoshop, but you can try this trick with any program that allows you to work with and blend layers.
Here's How
It Works
1 The first step is to open your image, select the entire image, copy it and paste it as a duplicate layer on top of the background. Be sure that this is pasted in as a layer; layers are objects that are separate from and float on top of the background. In some programs, you may have to create a new, empty layer first, then paste the copy onto this layer. In Photoshop, you can use the Duplicate Layer command in the Layer Palette.
2 The next step is to desaturate the layer's color. Desaturate here means removing all of the color information, so that what's left is a black-and-white version of the original. In Photoshop, you can simply use the Desaturate command. If your software doesn't have this command, go to the Hue/Saturation controls and bring the saturation level to zero. Check that the color is removed from this layer only, and not from the background layer.
3 Next, you want to invert this image layer. The Invert command in Photoshop turns a positive image into a negative one, or vice versa. If you're not using Photoshop, find the command in your software and apply it to your duplicate layer only. You should now be looking at a black-and-white negative of your original image.
Take It
Further
Once you've got some practice working with contrast masking, consider the possibilities. For example, you could try applying this technique only to specific places in an image.
Say you have a favorite portrait in which the background of the image looks perfect, but the subject is slightly overexposed (too light). You could create a selection around the subject, copy and paste only that selected area as a separate layer, then follow steps 2 through 5. Now you've adjusted only your portrait's subject without affecting his or her surroundings.
Used in this way, digital contrast masking can accurately "burn in" some areas of an image and "dodge" others. And because you're working on layers and not your original image, every adjustment can be done and undone a hundred times if you like, until the final image is exactly the way you want it!
|
4 At this point, I recommend applying a very slight blur to the duplicate layer. If you can use a Gaussian blur, try it with a radius of 1 or 2 pixels. Otherwise, use your software's most minimal blur effect.
5 Now we're ready to blend our two layers. Blending the layers adds the extra density of the black-and-white copy to the original color image below it, deepening the tonal range of the original. In Photoshop, this is done by changing the duplicate layer's mode in the Layer Options Palette. In some other programs, such as Ulead PhotoImpact, the command is called Merge.
Explore your program to find this function, then experiment with the various blending modes. In Photoshop, I generally use a few of the many modes available. I usually select Overlay, which could be considered the "normal" mode for this technique. Soft Light is the most subtle of the blending modes. I've also used the Color Burn mode when the original image is extremely thin. If you're not using Photoshop, try out the modes offered in your program and see what they do. |
|

|

Home
| Articles & Reviews
| Current Issue
| Past Issues
Staff & Contributors
| HelpLine
| Glossary
| Advertiser Info
Links
| Shopper
| Subscriptions
| Back Issues
Account Inquiry
| Submissions
| Contact Us
| About Us
| Privacy Statement
PCPHOTO Magazine is a publication of the Werner Publishing Corporation
12121 Wilshire Boulevard, 12th Floor, Los Angeles, CA 90025
Copyright© 2025 Werner Publishing Corp.

|
|


|