|


|
|
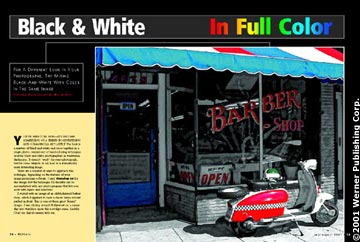
Black & White In Full Color
For A Different Look In Your Photographs, Try Mixing
Black-And-White With Color In The Same Image
Text And Photography By Wes G. Pitts
You've seen it by now—it's become something of a trend in advertising and commercial art lately. The look is a mixture of black-and-white and color together in a single photo, reminiscent of hand-coloring techniques used by black-and-white photographers in traditional darkrooms. It doesn't "work" for every photograph, but for some subjects, it can lead to a dramatically more interesting image.
There are a number of ways to approach this
technique, depending on the features of your
image-processing software. I used Photoshop 6.0 for this image, but the technique I'll describe can be accomplished with any photo program that lets you work with layers and selections.
I started with an image of an old-fashioned barber shop, which happened to have a classic Vespa scooter parked in front. This is one of those great "found" images. I was driving around Hollywood on a sunny day and stumbled upon this nostalgic scene. Luckily, I had my digital camera with me.
The original photo was alright—just alright. I had captured the primary elements of the scene: the scooter, the storefront and the quintessential red, white and blue barber's awning. The shot was taken midday, though, so
the lighting wasn't great. I felt like I had the start of a great image, but something was still missing. I thought about the subject a bit and decided that mixing black-and-white and color in the image might give it a faded, "old-time" look, appropriate for the scene.
1 I began by making some basic adjustments to the image, getting the brightness and contrast corrected, and tweaking the levels a bit to shore up the exposure. (Whether you use a scanner or a digital camera to get your image file, these initial adjustments are almost always necessary.)
2 Satisfied that the original image was well-tuned, I created a channel mixer adjustment layer, switched the color space of the layer to monochrome and adjusted the RGB channels to give me a good black-and-white exposure. If you aren't using Photoshop, you can get the same basic results by copying the entire image, pasting it as a new layer on top of the original, and then desaturating the new layer.
3a Next, I began selecting areas in the photograph where I wanted the original colors to show through the black-and-white layer. To
do this, I first tried using
Photoshop's selective color
command, but it was picking up areas of color in the image that I didn't want it to.
3b Instead, I switched the magic wand selection tool and simply clicked on areas of the image where I wanted color—the side of the Vespa, parts of the doorway, the multi-colored awning and the store's signage. If your software program doesn't offer a magic wand or similar tool, you can use the freehand selection tool to carefully outline those areas where you wish to preserve the color.
4 After selecting these areas, I refined the selection by smoothing and feathering it by three pixels. Then I simply used the cut command to remove those pixels from the black-and-white layer, which allowed the original color image to show through the black-and-white layer in the selected areas.
5 The last step: merging the two layers into a final image. In Photoshop (as well as many other photo applications that allow you to work with layers), you have
several layer blending modes from which to choose. I found that the "Soft Light" mode gave me the
most pleasing results, although a few of the other modes were also acceptable. If you have blending mode choices available to you, experiment with them for different effects. After selecting this blending mode, I "flattened" the image,
combining the two layers into one.
Although I liked my original photograph, I was much more pleased with this new interpretation of it. The mixture of black-and-white with color gave it a retro illustrative quality. This got me thinking about perhaps adding a special effect filter to the image to create a hand-drawn look. I decided on a colored-pencil effect.
To create this effect, I again selected the entire image, copied and pasted it in as a new top layer, and applied the colored-pencil effect filter to this top layer only. That way, I was able to adjust this layer's opacity and thereby control the amount of the effect that would be evident in the final flattened image.
I settled on an opacity of about 30%—just enough to create the
look of a hand drawing without overpowering the image. Again, I chose "Soft Light" blending for these two layers and flattened the image. As a final step, I went back to the levels and brightness contrast controls for some final fine-tuning of the image's overall exposure.
|
|

Home
| Articles & Reviews
| Current Issue
| Past Issues
Staff & Contributors
| Photo Books
| HelpLine
| Glossary
Advertiser Info
| Links
| Shopper
| Subscriptions
| Back Issues
Account Inquiry
| Submissions
| Contact Us
| About Us
| Privacy Statement
PCPHOTO Magazine is a publication of the Werner Publishing Corporation
12121 Wilshire Boulevard, 12th Floor, Los Angeles, CA 90025
Copyright© 2026 Werner Publishing Corp.
|
|


|