|
 |
 |
|
|
| |
Trade
Tricks: Changing Color
Using The Hue Adjustment For Creative Effects
Text And Photography By Rick Sammon
|
|
| |
| One of the coolest and
easiest things to do in the digital darkroom is to take
control of color. With a few clicks of a mouse, you can: |
| |
|
|
•
Get true color, even if your original picture is “off”
in color
• Increase the color
saturation of a picture, giving your picture more vibrancy
• Make a picture “warmer,”
which often makes a picture more appealing
• Reduce the color intensity
of a picture for realistic or creative effect
• Change the individual
colors in a scene for creative effects |
|
 |
|
|
|
|
|
| |
It’s this last technique—changing
the individual colors in a scene—that we’ll explore
here. One of the ways we can do that is to adjust the hue (the
actual quality of the color that makes it a specific color)
in a picture.
The Hue/Saturation control is found
in nearly every image-processing program on the market.
For example, in Adobe Photoshop, Hue is found in the Image menu:
Image>Adjustments>Hue/Saturation. With other imaging programs,
you can look in places like “Image,” “Enhance”
or “Color,” or check your help menu.
Okay, let’s start the fun! There’s an interesting
way to change only one color in many of these programs (including
Photoshop and Photoshop Elements).
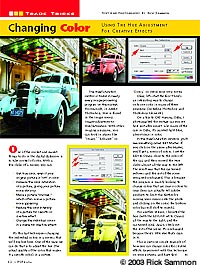
On a trip to Old Havana, Cuba, I photographed the vintage car
you see here just after sunset. Like many of the cars in Cuba,
it’s painted light blue, almost cyan in color.
In the Hue/Saturation window, you’ll
see something called Edit: Master. If you click on the
arrow after Master, you’ll get a menu of colors. I set
the Edit to Cyans, close to the color of the car, and then moved
the Hue slider almost all the way to the left. The result was
that the car turned yellow—and the rest of the scene remained
unchanged. This is because the program is mainly looking to
change colors that are cyan or close to cyan (you can actually
tell Adobe products to limit this further by moving your cursor
onto the photo and clicking on the color; the bottom color bar
will shift to match).
For another version, I boosted the hue (with the Edit still
set to Cyans) all the way to the right, and the car turned pink.
Again, check out the rest of the scene. It’s unchanged
because there’s little else that’s cyan in it.
This is just one simple example of how you can change color
for creative effects. Experiment with this technique on your
pictures, and have fun! |
|
| |
|
|
|

Home | Articles
& Reviews | Current
Issue | Past Issues
Staff & Contributors | Photo
Books | HelpLine
| Glossary
Advertiser
Info | Links | Shopper
| Subscriptions | eStore
Account Inquiry | Submissions
| Contact Us | About
Us
|
|
Click here for


|