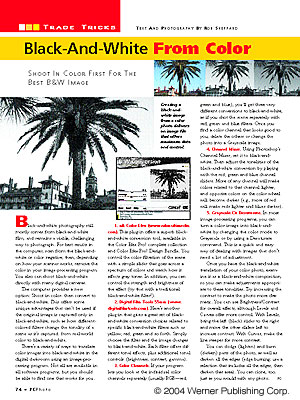
Black-and-white
photography still mostly comes from black-and-white film, and
remains a viable, challenging way to photograph. For best results
in the computer, scan from the black-and-white or color negative;
then, depending on how your scanner works, remove the color
in your image-processing program. You also can shoot black-and-white
directly with many digital cameras.
The computer provides a new option: Shoot in color, then convert
to black-and-white. This offers some unique advantages that
can’t be used if the original image is captured only in
black-and-white, such as how different-colored filters change
the tonality of a scene as it’s captured, from real-world
color to black-and-white.
There’s a variety of ways to translate color images into
black-and-white in the digital darkroom using an image-processing
program. Not all are available in all software programs, but
you should be able to find one that works for you.
1.
nik Color Efex (www.nikmultimedia.com).
This plug-in offers a superb black-and-white conversion tool,
available in the Color Efex Pro! complete collection and Color
Efex Pro! Design Bundle. You control the color filtration of
the scene with a simple slider that goes across a spectrum of
colors and watch how it affects gray tones. In addition, you
can control the strength and brightness of the effect (try that
with a traditional black-and-white filter!).
2.
Digital Film Tools 55mm (www.digitalfilmtools.com).
Here’s another plug-in that gives a great set of black-and-white
conversion choices related to specific black-and-white filters
such as yellow, red, green and so forth. Simply choose the filter
and the image changes to black-and-white. Each filter offers
different tonal effects, plus additional tonal controls (brightness,
contrast, gamma).
3.
Color Channels. If your program lets you look at the
individual color channels separately (usually RGB—red,
green and blue), you’ll get three very different conversions
to black-and-white, as if you shot the scene separately with
red, green and blue filters. Once you find a color channel that
looks good to you, delete the others or change the photo into
a Grayscale image.
4.
Channel Mixer. Using Photoshop’s Channel Mixer,
set it to black-and-white. Then adjust the tonalities of the
black-and-white conversion by playing with the red, green and
blue channel sliders. More of any channel will make colors related
to that channel lighter, and opposite colors on the color wheel
will become darker (e.g., more of red will make reds lighter
and blues darker).
5.
Grayscale Or Desaturate. In most image-processing programs,
you can turn a color image into black-and-white by changing
the color mode to Grayscale or by using a Desaturate command.
This is a quick and easy way of dealing with images that don’t
need a lot of adjustment.
Once you have the black-and-white translation of your color
photo, examine it as a black-and-white composition, so you can
make adjustments appropriate to these tonalities. Try increasing
the contrast to make the photo more dramatic. You can use Brightness/Contrast
for overall effects, although Levels and Curves offer more control.
With Levels, bring the left (black) slider to the right and
move the other sliders left to increase contrast. With Curves,
make the line steeper for more contrast.
You can dodge (lighten) and burn (darken) parts of the photo,
as well as darken all the edges (edge burning; use a selection
that includes all the edges, then darken that area). You can
clone, too, just as you would with any photo.