| |
You Might Already Be Using Layers
If I tell you that you’re already using layers, will
you give me a blank stare and scoff, “Yeah, right. I’m
not using layers”? I get that response in classes all
the time, but it’s true—you do use layers. Just
reading this magazine, you deal with layers, lots of them.
Each page is its own layer, separate from the rest, yet connected.
If you have a stack of prints, you have a layer stack.
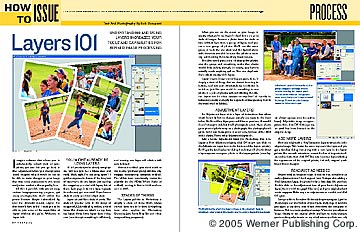
Layers act just like a stack of prints. The stack of “photos”
seen in the group of images of UCLA softball is, indeed, a
set of layers. You always see what’s on top first, top
layers block lower layers from being seen (even though everything
is still there), and moving one layer will affect what’s
seen below it.
Women’s softball gets short shrift in the media, yet
these young athletes play scrappy, entertaining, fast-pitch
softball. The UCLA team consistently makes the playoffs for
the NCAA World Series of softball, coming in first in 2004
and second in 2005.
Stacks Of Things
The Layers palette in Photoshop is simply a stack of items
that’s always viewed from top to bottom (everything here
also applies to Photoshop Elements, Jasc Paint Shop Pro and
other image-editing programs).
What you see on the screen as your image is exactly what you’d
see if you looked down on your stack of images. Remove a photo
from the stack or turn off that layer from a group of layers,
and you see a new group of photos. You’ll see the same
group in both the real stack and the layered stack, with elements
revealed because the photo is missing, not blocking the view
of any lower images.
You also could put a piece of clear yellow plastic over the
group, and everything under that plastic would look yellow,
though, of course, you haven’t actually made anything
yellow. You can duplicate these effects exactly with Layers.
Layers in your image-processing program, then, is simply a
stack of things that are viewed from top to bottom, and each
part of that stack can be affected in isolation, just like
you could do something to one photo in a pile of photos without
affecting the others. Layers can be clear, opaque or any level
of opacity in between (opacity is simply the opposite of transparency,
but it’s the word used by Adobe).
Adjustment Layers
An Adjustment Layer adds a layer of instructions that affects
what’s below it, but no changes actually are made to
the items below. It’s like a filter; if you put a red
filter on your lens, the world doesn’t change to red,
but it will photograph as red. If you place a green piece
of plastic wrap on a photograph, the photograph isn’t
green, but it sure looks green in some areas because of the
effect of the plastic. This is what Adjustment Layers do.
Add a Levels Adjustment Layer (in Photoshop, this is in Layers
> New Adjustment Layer; click OK or you can click on the
Adjustment Layer icon at the bottom of the Layers palette).
You’ll get the familiar Levels dialog box, but you’ll
also find that a layer appears over your photo in the Layers
palette (new layers always appear over the active layer).
Adjust the image as appropriate, then click OK. At this point,
no pixel has been harmed in the original image.
Add More Layers
Now you might add a Hue/Saturation Layer to tweak the color
of your image. This works the same way—add the layer
and you get a familiar dialog box along with a new layer in
the Layers palette. You can add saturation, correct the hue
of important colors and so forth, then click OK. You now have
two layers affecting the appearance of the original photo,
but still, original pixels haven’t been changed.
Readjust As Needed
As you work an image to make it look its best, sometimes an
early adjustment won’t look as good later. Perhaps after
adding a Hue/Saturation Layer, the photo looks a little dark.
No problem. Double-click on the adjustment icon of your Levels
Adjustment Layer (the box with the graph-like icon) and your
original adjustments reappear. Make any new adjustments as
needed and click OK again.
Save your file in the native file format for your program
(.psd for Photoshop), and you’ll retain all your layers,
ready to go to work for you again at any time, even if you
shut down the computer in between. This is a major quality
advantage. Whenever you adjust an image directly to the original
pixels and have to make changes, you’re making adjustments
on top of adjustments, which can only reduce quality. With
Adjustment Layers, that never happens.
Working The Layer Mask
Click on the white box to be sure you’re in the Layer
Mask. Now use your paintbrush to turn the effects of the Adjustment
Layer on or off, using white and black in your toolbar colors.
A common expression is “white reveals, black conceals,”
referring to the fact that white in the Layer Mask turns on
the effect of the Adjustment Layer, while black turns it off.
Or think of a room at night: turning on the light, adding
white light, allows you to see what’s in the room; turning
off the light makes the room black, preventing you from seeing
what’s in the room. You then can use a flashlight to
find and highlight parts of the room without showing it all.
Say you want to brighten the building, but not the sky, of
the photo at right. Turn off the layer’s effects by filling
the Layer Mask with black (in Adobe products, use Edit >
Fill, choose black, then OK). The adjustment disappears.
Be sure your paintbrush color is white and choose a soft paintbrush
a little smaller than the area you need to work with (the
building, in this case). Paint white over the area to turn
on the adjustment of the Adjustment Layer, but only where
you painted. If you make a mistake and paint in too much,
change the brush to black and paint the mistake right back
out.
Working The Image
Work an image by putting each adjustment on a separate layer.
To continue the temple photo example, use one layer for the
brightness of the building, a second layer (Curves) for darkening
the sky, and a third layer (Hue/Saturation) to intensify the
colors. (Technically, the bottom, or Background, is a layer,
but I’m referring to first, second and third layers as
added layers to the original image.)
Since only the sky needs to be darkened, the second layer
needs tweaking with its Layer Mask. Black is painted over
the building to remove the effect of the adjustment on the
structure. Increasing the color saturation of the whole image
works with the top layer, so there’s no need to do anything
with its Layer Mask.
If you do this step by step, layer by layer on any image,
you’ll quickly gain a care-fully adjusted image with
multiple layers before you can worry about layers. Keep each
layer isolated to a specific adjustment. When done, I usually
save this layered file as my master image, again, in the image
processor’s native file format. Then I flatten, size
and sharpen a file for a specific purpose, whether it’s
for a print or to be reproduced in a magazine or book, and
do a Save As to a TIFF or JPEG file. Check your Layer Menu
for the Flatten command.
|
|